Sunday, December 14, 2008

Frosty Friends & Aspen

First, I want to say that this is pretty much cased from Nicole Bailey. Thanks Nicole, this is a great card!!

This is a 6" x 6" card that uses the Aspen paper packet and the colors are Bamboo, Creme Brulee, Twilight and White Daisy.

The stamp set used is Frosty Friends. I stamped that in Black Staz-On ink, then colored it in with our ink pads using our Waterbrush. The "Wishing you a warm nose and toasty toes" phrase is also stamped in that Black Staz-On ink and, on that and on the snowmen, I used a sponge to edge Twilight ink around the edges.

The ribbon tied around the card is from our Creme Brulee Designer Ribbon Rounds Collection and the spiral clip and brads are from our Winter Cozy Mini-Medley Accents Collections.


Sunday, December 7, 2008

Holiday Mail For Heroes


I also wanted to mention this great program that the Red Cross and Pitney Bowes are doing this Christmas by delivering holiday mail to our men and women in the military. If you have extra Christmas cards, please consider sending them on for the Holiday Mail for Heroes.

http://www.redcross.org/email/saf/

From their website:

Holiday Mail for Heroes

Holiday Mail for Heroes is a partnership between the American Red Cross and Pitney Bowes to deliver one million holiday cards to American service members, veterans and their families in the United States and around the world.

Merry & Bright Cards

I just wanted to share the cards from the Merry & Bright Card Kit. I think these cards are so adorable!

Colors are Cranberry, New England Ivy, Olive, Sorbet and Colonial White. The kit comes with everything you need to create these cards and it doesn't take long at all to put the cards together. The results though look like you spent a lot of time working on them!


Saturday, December 6, 2008

Friendship Flowers & Sweet Pea

Just wanted to share the card my Mom made for my cousin's new baby.

The flowers are from the Friendship Flowers set and are stamped in Sunkiss Yellow and the leaves are stamped in Key Lime. The papers are from our Sweet Pea paper packet and those colors are Baby Pink, Breeze, Key Lime and Lilac Mist. Mom then finished off the flowers with buttons from our Spring Craft Buttons collection.

It doesn't really look like it in the picture, but the phrase is actually on vellum. Mom printed it off the computer on to vellum, let it dry and attached it to her card.

She did a little decorating as well in the inside of the card and the "Congratulations" phrase is from the Gracious Greetings set.


Sunday, November 30, 2008

Nursery Bash


I made this card for my cousin for her new baby boy! Welcome Breck!

The stamp set used is Nursery Bash. The little ducks stamp only has the three ducks on it, but I wanted it to show the four ducks, one for Mom, one for Dad, and two for their two little boys. So what I did is stamp the whole stamp down, then I masked what I had just stamped and stamped just another duck there in the front. They are stamped in Chocolate ink and I colored them in with our Coloring Pencils.

The papers used are from the Paper Garden paper packet and the colors are Blush, Petal, Sweet Leaf, Buttercup and Chocolate. The "Celebrate" is from the Say It In Style stamp set.

On the top, I tied our Colonial White Organdy Ribbon and added a Sweet Leaf Ribbon Slide from our Winter Cozy Mini Medley Accents Collection. The three brads on the bottom are also from the same Mini Medley Collection.

Sunday, November 23, 2008

Treasure Life


This is a card I made for a friend who was leaving us at work. This card is made out of our Perfect Day papers and the colors are Tulip, Sorbet and Colonial White. The stamp set is called Treasure Life and the "Congratulations" phrase is from the For Every Occasion set.

I stamped the middle portion with various stamps in that set and I stamped them full strength and then in second and third generation with both the Tulip and Sorbet inks. Then I took a sponge and sponged Sorbet ink around the edges and on to the picture a bit. That helped create the softer look. I also sponged the edges of the Congratulations phrase too. Then I finished the card off with an Colonial White Organdy Ribbon on the right side.

Saturday, November 22, 2008

Snow Friends Gift Card Holder

This card uses the Coluzzle File Folder Template to create this cute file folder card that will also hold a gift card in the inside. This great idea came from Connie MacFarland. You can view her website here.

I used the Coluzzle File Folder Template to cut out the file folder in White Daisy cardstock. Then I did the same thing again in Creative Basics Evensong Collection paper. Those two pieces are adhered together with the exception of a portion on the right side of the inside that was cut wide enough to slip in a gift card.

The front then is stamped with our Snow Friends set and colored in with Cranberry and New England Ivy markers. The three buttons on top tied with our Colonial White Waxy Flax are from our Holiday Craft Buttons collection.

The --- line on the sides is simply done with one of our Black My Legacy Writer Pen Set. I just used a ruler to keep the line straight and made simple dash marks.

Thanks for the great card idea Connie!!


Sunday, November 16, 2008

Stair Step Card

This was the birthday card I made for Mom's birthday. Happy Birthday Mom! =)

This is a stair step card and they are actually pretty easy to make. You start with a piece of cardstock 10.5" x 5" and score it at: 1.25", 2.5", 4.25", 6", 8.25" and the rest is up to you. I included a couple different shots of the card so you can see how it is folded together.

I learned how to make it from Leslie Markland and copied a few of her ideas too. Thanks Leslie! I think Mom really liked it too!!

The stamp sets used are Shining Star, Life's Creation and For Every Occasion. The paper packet used was Perfect Day and the colors are Juniper, Sorbet, Tulip and Colonial White. On the piece in the front where "Happy Birthday" is stamped, I also stamped one of the small flowers in second generation from the Life's Creation set in Tulip on there. It's kind of hard to see. Then the stars in the back were cut out and then I layered them on Colonial White cardstock and cut them out again with the border.


Saturday, November 15, 2008

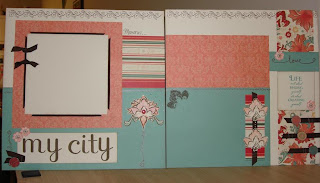
My City Layout

This layout uses our Perfect Day papers. Colors are Cocoa, Juniper, Sorbet, Tulip and Colonial White. The stamp set used was Life's Creation. For the "My City" letters, the Chocolate Alphabet was used. (That has to be the best named stamp set ever! =)


Quite a few small details on this layout that I wanted to share too. The first being our new Rub-Ons! Our Rub-Ons come in one package with three colors, White Daisy, Black and Chocolate. For this layout, we used the Chocolate Rub-Ons. So the border running across the top of both pages is from our Rub-Ons. So is the small Chocolate flower in each of the little stamped flowers by the "My City" phrase and "love" phrase. The "love" phrase is also a Rub-On as is the "Memories..." phrase. And so are the "brackets" on each side of the "My City" phrase.

Also, using our Black Stubble Tool in our Distressing Kit, Cocoa ink was added to all of the edges of the Colonial White pieces.

The large pieces of Juniper on the bottoms of each page were stamped second generation with the flowers in the Life's Creation set, but it is really hard to see that though.


The striped piece of B&T paper just below the "Memories..." phrase also has one of the stamps from the Life's Creation set stamped on it as well in second generation. That was a neat little touch!


Then the large flower on the right side of the "My City" phrase is also from the Life's Creation set and is several of those stamps layered together. It was then put up on foam tape for the dimension. I finished it off with a Tulip brad in the center from our Spring Blossom Mini Medely Collection and added some of our Sparkles along the flower's side for a little extra bling.


The three tokens beneath the "Life isn't about..." phrase are this catalog's Connections Club rewards. One was also place on the left of the "My City" sentiment.


Underneath the picture on the left page is Cocoa ribbon instead of cardstock! The ribbon was cut at angles and added under that Colonial White photo mat. Then two ribbon knots were attached to the side as well.


This was a fun layout, a lot of little extra touches!!

Saturday, November 8, 2008

Perfect Day

First, I have to say the idea for this card came from Anita Short. Thanks Anita =)

This card uses our Perfect Day papers and the colors are Cocoa, Juniper, Tulip, Sorbet and Colonial White. The stamp set that was used is called Life's Creation.

There is a piece of Cocoa cardstock in the middle of the card and that was sanded first. It also has two Colonial White brads in each end.

The phrase was stamped in Cocoa ink and the two little flowers on the top and bottom were also stamped in Cocoa. Then the insides of the flowers were stamped in Juniper and Sorbet and they were stamped off once first. I also have a little Sparkle in each of the flowers, but it may be hard to see in the picture.

Also the edges of the phrase and the Tulip paper that it was layered on have been scissor distressed to roughen up it up a bit and show off our white core cardstock.


Sunday, October 26, 2008

Winter Memories

This card uses our beautiful new Aspen papers and the Winter Memories stamp set. Colors are Twilight, Bamboo and Colonial White.

The snowman was stamped in Bamboo, then his hat and scarf were additional stamps in that set, so I stamped them in Twilight and cut them out on placed them on the snowman. His shadow, on the left, is also another stamp in that set that I stamped in Bamboo. Then the bottom where he sits, I used some torn paper and sponged Twilight ink on it and then placed it near the bottom so that it (hopefully!) looks like he is sitting on snow.

Then the other hat and mittens on the side were stamped and cut out. Then I punched a hole in them near the top and threaded the Colonial White Organdy Ribbon through them before tying the ribbon. And finally the phrase "Warm Winter Wishes" is up on pop dots to give it a little extra dimension.

He's such a cute snowman, but at this point, I can definitely wait for Winter! I'm not sure it is going to wait for me though!!


Saturday, October 18, 2008

Shining Star

First, I have to say that this card was pretty much lifted from Nona Pearl Davenport. The link to her blog is on the sidebar. She has some incredible artwork!!

This card uses the Shining Star stamp set. Also the "Noel" phrase is from the Peace on Earth set. The star and Noel are stamped in Bamboo ink. The star was cut out and layered on the Colonial White and Bamboo pieces. I also edged the Colonial White piece sponging it with Bamboo ink just to give it a softer look.

The background paper is from our Notebook paper packet and the colors are Blush and Bamboo. The card was then finished off with our Hollyhock Twill Ribbon.


Sunday, October 12, 2008

Aspen

Well last week here in Wisconsin it was 29 degrees when I woke up, so I shared a summer card. Yesterday it was 75 degrees so now I will share one of my winter cards! =D

This Snow card uses our new Aspen papers and the colors are Creme Brulee, Twilight and White Daisy. The stamp sets used are Boutique Alphabet and Feathery Flakes. On the inside of the card, I stamped "let it snow" from our Christmas Scripts set in Twilight ink.

The card is then finished off with our White Daisy Ric Rac ribbon and Sparkles on the snowflake used as the O in Snow.


Saturday, October 4, 2008

Laid Back Summer Days

Well, here in Wisconsin, it was 29 degrees when I woke up this morning! brrr! Then I opened the window to find the ground pretty white with frost. Yikes! I am really not ready for winter yet!! So I decided to post a nice summer-y card today. =)

This card uses the Laid Back paper packet. Colors are Dutch Blue, Vineyard Berry and Sunflower. The stamp set that looks sooo nice and relaxing is from the very appropriately named Paradise set.

All of the Dutch Blue, Sunflower and Vineyard Berry cardstock here has been sanded to reveal our white core and to give the card a softer, more relaxed, look.

The silver photo clip is from our Photo Clip collection and the circle was created using the Coluzzle circle.

Hope everyone takes time to enjoy the end of summer!


Sunday, September 21, 2008

Simple Blossoms

This card uses the Simple Blossoms stamp set. Colors are Blush, Twilight, White Daisy, Sweet Leaf and Clover Meadow. The patterned paper is from the Simple Pleasures set. The White Daisy paper on the right side is our Textured Cardstock. I simply ran the Twilight ink pad over the top of the cardstock just to show off it's texture and give it a little distressing.

The heart in the top left corner is also from that set. The corner is being held down with a Pewter Concho.

And the card has a different fold to it and you can see it opened up on the bottom picture. Just a little something different!


Sunday, September 7, 2008

Sympathy

I wanted to share a sympathy card I made for a friend who recently and very unexpectedly passed away. I always find it very hard to make sympathy cards, but I often think that is because of the subject of the card. So I wanted to share this one and hopefully provide some help for anyone dealing with this unfortunate subject too.

This card was made with the Paper Garden papers and the colors are Blush, Buttercup, Petal, Sweet Leaf and Colonial White. The third piece of the Paper Garden papers is also stamped with our Sweet Flowers set. I stamped the flowers in Petal and the stems in Garden Green. The "With Sincere Sympathy" stamp is from the Comforting Thoughts set and that was also stamped in Petal. The bottoms of each of the sections of Paper Garden paper was ripped and the card was finished off with Blush Ribbon from the Colonial White Collection of Designer Ribbons.


Monday, September 1, 2008

Just Because

September is National Stamping Month and on special this month is this amazing card kit that includes everything to create all of these cards! The stamp set used is called Just Because and the kit uses our beautiful new color, Tulip. It also uses Cocoa and Colonial White. Many of these cards were then finished off using our Cocoa Grosgrain Ribbon and our Sparkles for a nice little extra touch.


Sunday, August 31, 2008

With Love


This was the card my Mom recently made for Grandma's birthday. Mom said she lifted this card from a great card done by Carolyn Hulin.

The stamp set she used was the With Love set and the Happy Birthday phrase is from the Birthday Script set. Colors are Twilight, Chocolate and White Daisy.

The stamp from the With Love set was stamped in the background with Twilight ink on Twilight paper. Then it was also stamped over the top of that and embossed with White Daisy Embossing Powder. That portion was finished with a perfectly placed paper flower and brad from our Mini-Medely Accents in Shades of Chocolate Collection.

The Happy Birthday phrase was also heat embossed in White Daisy Embossing Powder. And this card actually opens from the bottom up instead of from side to side. It is a fun little variation.

The card was then completed with Chocolate Organdy ribbon tied across the top.

Carolyn has a ton of other fantastic artwork on her website at http://carolynh.myctmh.com.


Sunday, August 24, 2008

Simple Beauty


First, I have to say this layout is lifted from Jena Vee DeVries. She did the original layout and it was sooo wonderful I had to try it too! The link to her blog is on the side as well if you want to check it out.

The layout uses the Simple Beauty stamp set. All the paper is our textured cardstock, the only exception is the stamping done on the Colonial White paper that is stamped with the Sweet Leaf ink and then is cut around. All the flowers have been cut again out from other colors and the backgrounds are all textured cardstock as well. Also, our textured cardstock comes with one color on one side and a lighter color on the other side, so it works out great and gives a lot of different options.

The colors that were used are Colonial White, Petal, Sweet Leaf, Heavenly Blue and Amethyst. The stamping of the flowers was done in Sweet Leaf. Then various papers were cut and placed on top of the inked flowers using the textured cardstock of Petal, Heavenly Blue, Amethyst and Smokey Plum. And all the pieces were sanded with our Sanding Kit sandpapers.

I also colored in all the leaves with our Olive Watercolor Pencil and blended it around with our Waterbrush. For some of the smaller pieces of the flowers, those are also colored in with Watercolor pencils and blended with the Waterbrush as well.

Along the bottom are a couple strips of paper from our Promise of Spring paper packet. Those were both edged with our Edge Distressor. The phrase in the circle is also from that stamp set as well and the circles were cut from our circle Coluzzles.

The "Simple Beauty" is actually printed off of the computer using our Font CD. This font is called CTMH Aristocrat.

Finally to help finish it off, there are Garden Green brads and Colonial White brads in several of the flowers. Also there are a few dots of Liquid Glass in other places to give it a different look as well. And while mentioning Liquid Glass, it also makes a great adhesive. I used the Liquid Glass several times with the small flower pieces that had to be cut out and adhered. Just a dot of the Liquid Glass on the original paper and put the new cut piece on top of it and after a little drying, it stays there perfectly!

Here are a few closeups:


Sunday, August 17, 2008

Flutter

This card uses the Flutter and Fluttering Frames sets and uses Tissue Inking as the technique to color the butterflies and the frame. The "thank you" phrase is from the Life Is So Good set. That stamp was cut in half in order to make it work with the frame.

First, the colors are Topiary, Hollyhock, Buttercup and White Daisy. The background of the card is in Topiary cardstock and first was sanded, then I stamped the background image from the Fluttering Frames set in second generation on there to give it a lighter effect.

The Tissue Inking is very simple and has an amazing look! To do it, first take your stamp and ink it up in the lightest color just as you would ink up any stamp. In this case, the stamp was inked with Buttercup ink. Then take a tissue (or any Kleenex) and dab that in your next lightest color until it is soaked well, then tap that on to your stamp. The butterflies used Hollyhock as the second lightest color. Then take your darkest color and do the same thing with your tissue, dabbing it in the ink pad first, then use that inked up tissue to tap on to your stamp. On these butterflies, Topiary ink was the final color. Huff on the stamp to remoisten the ink and stamp it down. The fun thing is that every time you do it, you will get something different! It may take a little practice at first, but the effect it creates is well worth it!

The card was then finished off with White Daisy Brads and White Daisy Organdy Ribbon.


.

Sunday, August 10, 2008

More To Adore Birthday Card

I recently had a birthday and wanted to share the great card my sweet Mom made for me. I just love it!!

She used the More to Adore Paper Packet and the colors are Blush, Chocolate, Hollyhock and Vanilla Cream.

The stamp set she used is called Friendship Blessings and each of the flowers was embossed in White Daisy Embossing Powder. The birthday sentiment is from the Card Sentiments set and she embossed that on the outside and inside in Gold Embossing Powder. Then for embellishments on the flowers she used our Sparkles, Gold Brads, a Bigger White Daisy Brad and a clear Craft Button.
.
Oh and the Happy Birthday stamped on the inside is from the For Every Occassion set.
.
Thanks again for such a beautiful card Mom! =)


.
.
.

Sunday, July 20, 2008

Rising Up


This page is a 6" x 6" page for a quote swap I had participated in. This is a favorite quote of mine and is found in the Follow Your Dreams stamp set. The flowers are from the Life Is So Good set and the bees and the heart are from the A Little Bee set. Finally, the letters along the side are from the Precious Alphabet set.

The colors are Heavenly Blue, Blush, Sunny Yellow, Garden Green and Colonial White. The two pieces with the quote stamped on them are also raised up on foam tape for a little extra dimension. And there is also some edging done with the Heavenly Blue ink on the larger Colonial White piece.
x

Sunday, July 13, 2008

Serendipity Pages

These pages use the Serendipity papers. Colors are Dutch Blue, Outdoor Denim, Colonial White, White Daisy and Chocolate. All the cardstock used on the pages is our textured cardstock. Love how that looks -- it gives the pages just a different look to them! Plus the textured cardstock has the main color on one side and a lighter version of the color on the other side. So that is where the different shades come in as well.

Okay first, let me say that the left page was completely lifted from another very talented consultant. And we based the right page on the left page as well. But I do not have the consultant's name, unfortunately. If this was your page, please let me know so I can give you proper credit!!

Then to make the layout, we started with only the left page. So what we did was look in our Cherish and Imagine books for a layout that was similar. And we found the Grand Finale layout in Imagine. But what we did with the layout is take the Imagine book and turned it completely upside down! Then we followed the layout that way.

All the flowers are from the Serendipity stamp set. They were stamped on the textured cardstock and cutout. We then took that color of ink and inked the edges of the flowers to give it just an extra touch. The bottom of the flowers were attached directly to the page, but the layers on top were added with foam tape to give it an extra dimension. Then the flowers were finished off with a small Pewter Spiral with one of our Bigger Brads in the middle.

The pages were then finished off with the Playful Flourishes stamp set. We stamped that with the White Daisy ink. Since our White Daisy ink is a pigment ink pad, it takes a while longer to dry (or you can dry it faster with the heat tool), but the color is so much richer!

These pages just turned out fantastic! It was a lot of cutting, but I just love how they look!!


And just a closeup shot of one of the flowers.