Sunday, November 30, 2008
Nursery Bash
I made this card for my cousin for her new baby boy! Welcome Breck!
The stamp set used is Nursery Bash. The little ducks stamp only has the three ducks on it, but I wanted it to show the four ducks, one for Mom, one for Dad, and two for their two little boys. So what I did is stamp the whole stamp down, then I masked what I had just stamped and stamped just another duck there in the front. They are stamped in Chocolate ink and I colored them in with our Coloring Pencils.
The papers used are from the Paper Garden paper packet and the colors are Blush, Petal, Sweet Leaf, Buttercup and Chocolate. The "Celebrate" is from the Say It In Style stamp set.
On the top, I tied our Colonial White Organdy Ribbon and added a Sweet Leaf Ribbon Slide from our Winter Cozy Mini Medley Accents Collection. The three brads on the bottom are also from the same Mini Medley Collection.
Sunday, November 23, 2008
Treasure Life
This is a card I made for a friend who was leaving us at work. This card is made out of our Perfect Day papers and the colors are Tulip, Sorbet and Colonial White. The stamp set is called Treasure Life and the "Congratulations" phrase is from the For Every Occasion set.
I stamped the middle portion with various stamps in that set and I stamped them full strength and then in second and third generation with both the Tulip and Sorbet inks. Then I took a sponge and sponged Sorbet ink around the edges and on to the picture a bit. That helped create the softer look. I also sponged the edges of the Congratulations phrase too. Then I finished the card off with an Colonial White Organdy Ribbon on the right side.
Saturday, November 22, 2008
Snow Friends Gift Card Holder
This card uses the Coluzzle File Folder Template to create this cute file folder card that will also hold a gift card in the inside. This great idea came from Connie MacFarland. You can view her website here.
I used the Coluzzle File Folder Template to cut out the file folder in White Daisy cardstock. Then I did the same thing again in Creative Basics Evensong Collection paper. Those two pieces are adhered together with the exception of a portion on the right side of the inside that was cut wide enough to slip in a gift card.
The front then is stamped with our Snow Friends set and colored in with Cranberry and New England Ivy markers. The three buttons on top tied with our Colonial White Waxy Flax are from our Holiday Craft Buttons collection.
The --- line on the sides is simply done with one of our Black My Legacy Writer Pen Set. I just used a ruler to keep the line straight and made simple dash marks.
Thanks for the great card idea Connie!!
Sunday, November 16, 2008
Stair Step Card
This was the birthday card I made for Mom's birthday. Happy Birthday Mom! =)
This is a stair step card and they are actually pretty easy to make. You start with a piece of cardstock 10.5" x 5" and score it at: 1.25", 2.5", 4.25", 6", 8.25" and the rest is up to you. I included a couple different shots of the card so you can see how it is folded together.
I learned how to make it from Leslie Markland and copied a few of her ideas too. Thanks Leslie! I think Mom really liked it too!!
The stamp sets used are Shining Star, Life's Creation and For Every Occasion. The paper packet used was Perfect Day and the colors are Juniper, Sorbet, Tulip and Colonial White. On the piece in the front where "Happy Birthday" is stamped, I also stamped one of the small flowers in second generation from the Life's Creation set in Tulip on there. It's kind of hard to see. Then the stars in the back were cut out and then I layered them on Colonial White cardstock and cut them out again with the border.
Saturday, November 15, 2008
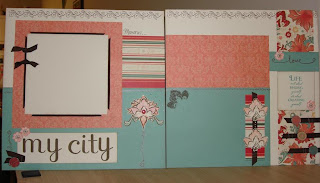
My City Layout
This layout uses our Perfect Day papers. Colors are Cocoa, Juniper, Sorbet, Tulip and Colonial White. The stamp set used was Life's Creation. For the "My City" letters, the Chocolate Alphabet was used. (That has to be the best named stamp set ever! =)
Quite a few small details on this layout that I wanted to share too. The first being our new Rub-Ons! Our Rub-Ons come in one package with three colors, White Daisy, Black and Chocolate. For this layout, we used the Chocolate Rub-Ons. So the border running across the top of both pages is from our Rub-Ons. So is the small Chocolate flower in each of the little stamped flowers by the "My City" phrase and "love" phrase. The "love" phrase is also a Rub-On as is the "Memories..." phrase. And so are the "brackets" on each side of the "My City" phrase.
Then the large flower on the right side of the "My City" phrase is also from the Life's Creation set and is several of those stamps layered together. It was then put up on foam tape for the dimension. I finished it off with a Tulip brad in the center from our Spring Blossom Mini Medely Collection and added some of our Sparkles along the flower's side for a little extra bling.
Underneath the picture on the left page is Cocoa ribbon instead of cardstock! The ribbon was cut at angles and added under that Colonial White photo mat. Then two ribbon knots were attached to the side as well.
Quite a few small details on this layout that I wanted to share too. The first being our new Rub-Ons! Our Rub-Ons come in one package with three colors, White Daisy, Black and Chocolate. For this layout, we used the Chocolate Rub-Ons. So the border running across the top of both pages is from our Rub-Ons. So is the small Chocolate flower in each of the little stamped flowers by the "My City" phrase and "love" phrase. The "love" phrase is also a Rub-On as is the "Memories..." phrase. And so are the "brackets" on each side of the "My City" phrase.
Also, using our Black Stubble Tool in our Distressing Kit, Cocoa ink was added to all of the edges of the Colonial White pieces.
The large pieces of Juniper on the bottoms of each page were stamped second generation with the flowers in the Life's Creation set, but it is really hard to see that though.
The striped piece of B&T paper just below the "Memories..." phrase also has one of the stamps from the Life's Creation set stamped on it as well in second generation. That was a neat little touch!
Then the large flower on the right side of the "My City" phrase is also from the Life's Creation set and is several of those stamps layered together. It was then put up on foam tape for the dimension. I finished it off with a Tulip brad in the center from our Spring Blossom Mini Medely Collection and added some of our Sparkles along the flower's side for a little extra bling.
The three tokens beneath the "Life isn't about..." phrase are this catalog's Connections Club rewards. One was also place on the left of the "My City" sentiment.
Underneath the picture on the left page is Cocoa ribbon instead of cardstock! The ribbon was cut at angles and added under that Colonial White photo mat. Then two ribbon knots were attached to the side as well.
This was a fun layout, a lot of little extra touches!!
Saturday, November 8, 2008
Perfect Day
First, I have to say the idea for this card came from Anita Short. Thanks Anita =)
This card uses our Perfect Day papers and the colors are Cocoa, Juniper, Tulip, Sorbet and Colonial White. The stamp set that was used is called Life's Creation.
There is a piece of Cocoa cardstock in the middle of the card and that was sanded first. It also has two Colonial White brads in each end.
The phrase was stamped in Cocoa ink and the two little flowers on the top and bottom were also stamped in Cocoa. Then the insides of the flowers were stamped in Juniper and Sorbet and they were stamped off once first. I also have a little Sparkle in each of the flowers, but it may be hard to see in the picture.
Also the edges of the phrase and the Tulip paper that it was layered on have been scissor distressed to roughen up it up a bit and show off our white core cardstock.
Subscribe to:
Posts (Atom)