Sunday, January 18, 2009

Baptism Card

This is the card I made for my Godson for his baptism today.

The stamp sets used are Key to My Heart and God Bless You. The paper is from the Apsen paper packet and the colors are Twilight, Outdoor Denim and Colonial White.

For the key, I first stamped it in Twilight ink and rolled it around a bit in the Outdoor Denim ink to give it the different colors look it has.

Then on the inside, I wrote about how God will always be the key for your whole life. =)

Saturday, January 3, 2009

Purr.Fect

Just sharing a fun and Purr.Fect layout I worked on tonite! Purr.Fect is the name of the stamp set used! The papers are from the Silhouette Creative Basics collection and the colors are Black, Colonial White, Autumn Terracotta and Bamboo.

The "Cat Tales" title was stamped with the Friendship Alphabet set and they were each cut out and placed on the layout. In retrospect, I think it would have been much easier to just stamp the title phrase on the cardstock instead of doing all that cutting!! =)

Oh and the little "fishies" on the right page were made from Autumn Terracotta Photo Anchors and ribbon. They seem to work just purr.fect together to make those "fishies"!

The inspiration for this layout came, for the most part, from someone else, but unfortunately, I do not have that person's name. If this was your great layout, please let me know so I can give you proper credit. Thanks!


Thursday, January 1, 2009

Aspen & All Decked Out

Hope everyone had a very merry Christmas and a wonderful new year! Welcome to 2009!

First, I have to say the inspiration for this layout came from Nancy Brown and Diane Fischer. Great layout, I just love it!!

This layout uses the Aspen Paper Packet with the Feathery Flakes stamp set, the All Decked Out stamp set and the Friendship Alphabet stamps. Colors are Twilight, Bamboo and Colonial White.

All the snowflakes are from the Feathery Flakes set and were heat embossed in our White Daisy Embossing Powder. The ribbon is from the Creme Brulee Designer Ribbon Rounds Collection. And the scallop edges were simply cut with a Fiskers scissor.

Oh and Stickles were used on the snowman's scarf and along the bottom of the snowman on the right page. There is also our Sparkles on there too and on some of the snowflakes. Always need a little bling!


The word "snow" has Liquid Applique across the tops of the letters to (hopefully!) look like snow. The Liquid Applique was heated with a craft heater and it puffs up like that. Works great for winter pages!


There are our Twilight Corduroy Brads from our Winter Cozy Mini Medely Accents on the snowman's earmuffs to keep him warm!


I also wanted to mention there was some paper piecing on this layout with the snowman's hat and scarf. On his hat on the left page, it was cut from our Aspen papers, but the band that goes across the hat, above the rim, was stamped on one of our different Aspen papers. That piece alone was just cut out and adhered on top of his hat. The same was done with the snowman's scarf on the right page. It was first stamped in the Twilight Aspen paper. Then the scarf was stamped again on Bamboo and all of those pieces were cut out separately and adhered to his scarf. That creates a very unique look!


Sunday, December 14, 2008

Frosty Friends & Aspen

First, I want to say that this is pretty much cased from Nicole Bailey. Thanks Nicole, this is a great card!!

This is a 6" x 6" card that uses the Aspen paper packet and the colors are Bamboo, Creme Brulee, Twilight and White Daisy.

The stamp set used is Frosty Friends. I stamped that in Black Staz-On ink, then colored it in with our ink pads using our Waterbrush. The "Wishing you a warm nose and toasty toes" phrase is also stamped in that Black Staz-On ink and, on that and on the snowmen, I used a sponge to edge Twilight ink around the edges.

The ribbon tied around the card is from our Creme Brulee Designer Ribbon Rounds Collection and the spiral clip and brads are from our Winter Cozy Mini-Medley Accents Collections.


Sunday, December 7, 2008

Holiday Mail For Heroes


I also wanted to mention this great program that the Red Cross and Pitney Bowes are doing this Christmas by delivering holiday mail to our men and women in the military. If you have extra Christmas cards, please consider sending them on for the Holiday Mail for Heroes.

http://www.redcross.org/email/saf/

From their website:

Holiday Mail for Heroes

Holiday Mail for Heroes is a partnership between the American Red Cross and Pitney Bowes to deliver one million holiday cards to American service members, veterans and their families in the United States and around the world.

Merry & Bright Cards

I just wanted to share the cards from the Merry & Bright Card Kit. I think these cards are so adorable!

Colors are Cranberry, New England Ivy, Olive, Sorbet and Colonial White. The kit comes with everything you need to create these cards and it doesn't take long at all to put the cards together. The results though look like you spent a lot of time working on them!


Saturday, December 6, 2008

Friendship Flowers & Sweet Pea

Just wanted to share the card my Mom made for my cousin's new baby.

The flowers are from the Friendship Flowers set and are stamped in Sunkiss Yellow and the leaves are stamped in Key Lime. The papers are from our Sweet Pea paper packet and those colors are Baby Pink, Breeze, Key Lime and Lilac Mist. Mom then finished off the flowers with buttons from our Spring Craft Buttons collection.

It doesn't really look like it in the picture, but the phrase is actually on vellum. Mom printed it off the computer on to vellum, let it dry and attached it to her card.

She did a little decorating as well in the inside of the card and the "Congratulations" phrase is from the Gracious Greetings set.


Sunday, November 30, 2008

Nursery Bash


I made this card for my cousin for her new baby boy! Welcome Breck!

The stamp set used is Nursery Bash. The little ducks stamp only has the three ducks on it, but I wanted it to show the four ducks, one for Mom, one for Dad, and two for their two little boys. So what I did is stamp the whole stamp down, then I masked what I had just stamped and stamped just another duck there in the front. They are stamped in Chocolate ink and I colored them in with our Coloring Pencils.

The papers used are from the Paper Garden paper packet and the colors are Blush, Petal, Sweet Leaf, Buttercup and Chocolate. The "Celebrate" is from the Say It In Style stamp set.

On the top, I tied our Colonial White Organdy Ribbon and added a Sweet Leaf Ribbon Slide from our Winter Cozy Mini Medley Accents Collection. The three brads on the bottom are also from the same Mini Medley Collection.

Sunday, November 23, 2008

Treasure Life


This is a card I made for a friend who was leaving us at work. This card is made out of our Perfect Day papers and the colors are Tulip, Sorbet and Colonial White. The stamp set is called Treasure Life and the "Congratulations" phrase is from the For Every Occasion set.

I stamped the middle portion with various stamps in that set and I stamped them full strength and then in second and third generation with both the Tulip and Sorbet inks. Then I took a sponge and sponged Sorbet ink around the edges and on to the picture a bit. That helped create the softer look. I also sponged the edges of the Congratulations phrase too. Then I finished the card off with an Colonial White Organdy Ribbon on the right side.

Saturday, November 22, 2008

Snow Friends Gift Card Holder

This card uses the Coluzzle File Folder Template to create this cute file folder card that will also hold a gift card in the inside. This great idea came from Connie MacFarland. You can view her website here.

I used the Coluzzle File Folder Template to cut out the file folder in White Daisy cardstock. Then I did the same thing again in Creative Basics Evensong Collection paper. Those two pieces are adhered together with the exception of a portion on the right side of the inside that was cut wide enough to slip in a gift card.

The front then is stamped with our Snow Friends set and colored in with Cranberry and New England Ivy markers. The three buttons on top tied with our Colonial White Waxy Flax are from our Holiday Craft Buttons collection.

The --- line on the sides is simply done with one of our Black My Legacy Writer Pen Set. I just used a ruler to keep the line straight and made simple dash marks.

Thanks for the great card idea Connie!!


Sunday, November 16, 2008

Stair Step Card

This was the birthday card I made for Mom's birthday. Happy Birthday Mom! =)

This is a stair step card and they are actually pretty easy to make. You start with a piece of cardstock 10.5" x 5" and score it at: 1.25", 2.5", 4.25", 6", 8.25" and the rest is up to you. I included a couple different shots of the card so you can see how it is folded together.

I learned how to make it from Leslie Markland and copied a few of her ideas too. Thanks Leslie! I think Mom really liked it too!!

The stamp sets used are Shining Star, Life's Creation and For Every Occasion. The paper packet used was Perfect Day and the colors are Juniper, Sorbet, Tulip and Colonial White. On the piece in the front where "Happy Birthday" is stamped, I also stamped one of the small flowers in second generation from the Life's Creation set in Tulip on there. It's kind of hard to see. Then the stars in the back were cut out and then I layered them on Colonial White cardstock and cut them out again with the border.


Saturday, November 15, 2008

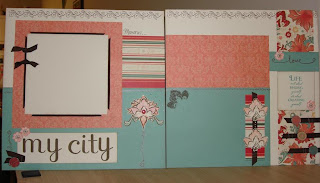
My City Layout

This layout uses our Perfect Day papers. Colors are Cocoa, Juniper, Sorbet, Tulip and Colonial White. The stamp set used was Life's Creation. For the "My City" letters, the Chocolate Alphabet was used. (That has to be the best named stamp set ever! =)


Quite a few small details on this layout that I wanted to share too. The first being our new Rub-Ons! Our Rub-Ons come in one package with three colors, White Daisy, Black and Chocolate. For this layout, we used the Chocolate Rub-Ons. So the border running across the top of both pages is from our Rub-Ons. So is the small Chocolate flower in each of the little stamped flowers by the "My City" phrase and "love" phrase. The "love" phrase is also a Rub-On as is the "Memories..." phrase. And so are the "brackets" on each side of the "My City" phrase.

Also, using our Black Stubble Tool in our Distressing Kit, Cocoa ink was added to all of the edges of the Colonial White pieces.

The large pieces of Juniper on the bottoms of each page were stamped second generation with the flowers in the Life's Creation set, but it is really hard to see that though.


The striped piece of B&T paper just below the "Memories..." phrase also has one of the stamps from the Life's Creation set stamped on it as well in second generation. That was a neat little touch!


Then the large flower on the right side of the "My City" phrase is also from the Life's Creation set and is several of those stamps layered together. It was then put up on foam tape for the dimension. I finished it off with a Tulip brad in the center from our Spring Blossom Mini Medely Collection and added some of our Sparkles along the flower's side for a little extra bling.


The three tokens beneath the "Life isn't about..." phrase are this catalog's Connections Club rewards. One was also place on the left of the "My City" sentiment.


Underneath the picture on the left page is Cocoa ribbon instead of cardstock! The ribbon was cut at angles and added under that Colonial White photo mat. Then two ribbon knots were attached to the side as well.


This was a fun layout, a lot of little extra touches!!